

Transcribing Basics For Guitarists

Published: 10/10/2013
Under: Guitar Lessons
Have you grown frustrated with your lack of progress? Yet seem to be practicing your butt off night after night?
I’m going to show you a really simple yet powerful idea you can start using today to transform your guitar playing. Introducing transcribing basics.
Although this is an advanced concept, there is no reason why you can’t try this, even if you’re a beginner guitarist with the basics nailed.
What is transcribing?
To me, it’s this –
“The ability to hear a piece of music, figure it out and then write it down”
Why do we need this skill?
How you ever spend hours searching for a TAB with no luck?
By understanding the basics of transcribing, you’ll never need to search for a TAB again. As you become better at transcribing, you can share it with the world using one of the many TAB sites.
I still use this skill often. Whether it’s working out whole songs, guitar solos, or even an individual lick. Applying the basics of transcribing allows me to play along with songs I currently liked or steal an idea from someone.
I actually couldn’t teach without it, as I teach my students concept and idea using other people’s songs, licks and ideas.
Also, the majority of the gig’s I’ve done professionally in the last 12 years were artists who gave me MP3 (or a CD) and left me to get on with it! You see I had to be able to transcribe in order to take the gig.
Also once you get seriously good at it, you’ll be able to do it on the fly. Just imagine being able to trade licks with the keyboard player, by playing something really similar back just in your own style!
This is just some of the ways I use transcribing. And so can you.
Basics of transcribing – my process
Let’s walk through how to transcribe, step by step. I’m going to show you using a song. However, you can use actually the same steps for working out a guitar solo or even a lick.
Step 1: Listen
I’ll listen to the song at least 3 times. Sometimes, I can understand the song in a few plays, whereas other times I’ll have to play it 10 times.
Step 2: Structure
After listening to the song a few times, I’ll replay it and note down the song’s structure. I always start by asking myself questions like: Does it start with an Intro? Is there a guitar solo after the third chorus?
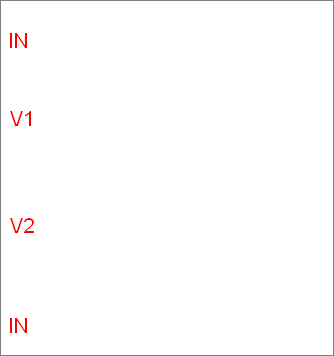
I’ll note this down on paper, using a pencil, so it’s not permanent – in case I’m wrong. I always write the structure in the margin, down the page, allowing enough space to write out the bars contain in that section.
If it’s a simple song, I can usually get 8 bars per line, whereas if it’s complex with lots of weird chords – I only might fit in 4 bars.
At this stage get a rough idea of structure noted down. You don’t need to worry too much about getting it perfect. Here’s a rough idea of how it look:
Step 3: First Note
Next, we need to find the key of the song. The best way to do this is to pick up a guitar.
I’ve found that the chorus is usually the best place to start. It’s likely that the chords are more obvious and the guitar part is easier to hear.
Over the chorus, I will try and find the first chord or two. I’ll start with bass notes, any random one will do. How does it sound? Not right?! Try another one.
At this point, it’s just trial and error. It could take a few times around the chorus for you to find the first chord’s bass note.
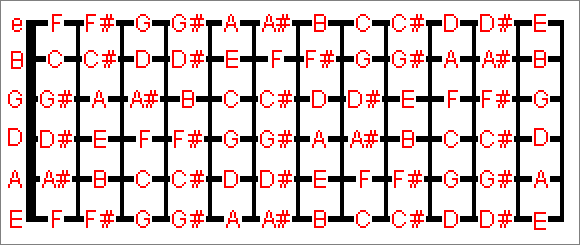
When you’ve got it to make a note, just a single letter will do. This is where you need to know what the notes are called on the fretboard.
Step 4: Second Note
So, you’ve got the first chord’s bass note, that’s great! You now need to think about the second chord and its bass note.
Are we moving down, up or staying put? If down how far down are we moving? Are we moving down a string? Once you’ve got it, again, write it down.
Step 5: Finishing Off
Keep going until you have a rough idea of the bass line for the chorus. Don’t worry too much if some are wrong as over time you’ll hearing will improve and it’ll be easier.
Step 5: Actual Chords
Now that you have the complete bass line for the chorus, it’s time to work out what the chords actually are. Think in terms of triads – why? It’s the simple form of chords we have. Simple is always better!
We have four triad types: Major, Minor, Augmented and Diminished.
First, try playing every chord as a major triad. What chords work? Do any sound wrong? If it works then just leave the bass note as you have it. If it sounds wrong, it’s either a minor chord or it’s a wrong note.
The only way to find out is to try. So play through the chorus again, trying with this chord as a minor with the rest as major. If it sounds right, it’s a minor, and so you’ll want to write a little ‘m’ next to the bass note to indicate it’s a minor chord.
However, if it’s a wrong note, stop there and just listen to it a few more times. Usually after a couple of times through you should be able to hear it and be able to correct it.
Advanced tip: If you’re working out a guitar part, try to find their voicing as well. Tricky!
Step 6: Timing
Next up, you need to think about timing. Are we playing four notes per chord across a whole bar? maybe we have two chords per bar?
Are we playing a passing chord on beat four? Is that second chord being pushed so we play it on the + of the 2, rather than on beat 3?
Again, have a go – write down the timing for the chorus.
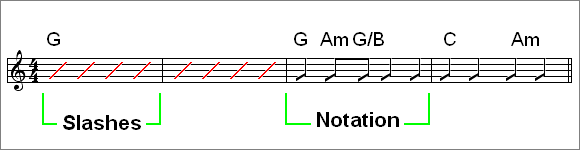
I generally use slashes to note simple rhythms like one chord per bar or two chords playing two beats. I only ever write out the full rhythm if it’s a critical part of the song.
For example, I would write out the full rhythm of a chic riff as what Nile Rodgers is playing is the hook of the song. If I’m going to play the song properly, I need to nail the exact rhythm Nile is playing.
Step 7: Verses
Following the steps above, work out the chords for the verses. Again it will take some time.
Then go back over and listen for the timing. Try to get a rough idea written down, so that you can come back to later and get it perfect.
Step 8: What’s left
Next up is the sections that are left. You might have a Solo or a Bridge or a Pre-chorus. Whatever you have left, this is the time to work it out.
Step9: Write it up!
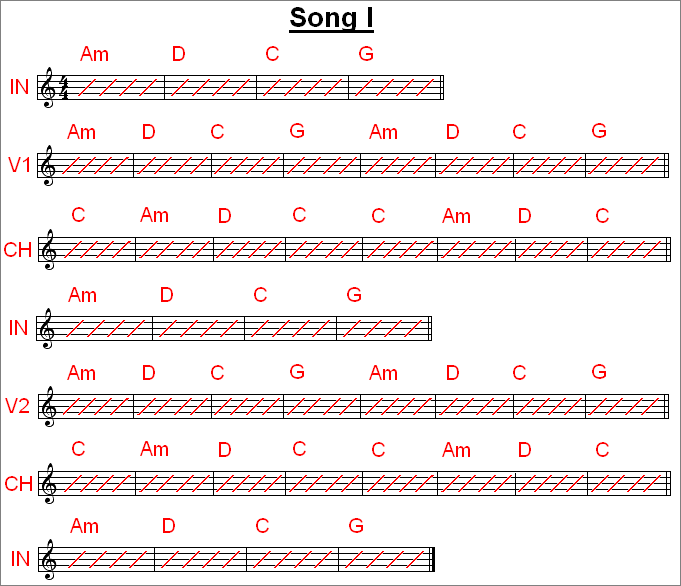
You should have a rough chord chart written in pencil. You’ve done great, so far!
You now need to try it out, if there’s a wrong chord or two, now is the time to fix it.
When you’re happy it’s completed, time to write it up in pen and make it look a pro chart.
Step 10: Try it again!
Start another song. Work on something a little bit harder, more complex. Test yourself. Keep trying and you’ll see the improvement in your playing.
When Should We Transcribe?
You should try it today. Try it now!
Share these transcribing basics!
If you’ve followed the steps above, then you’ve transcribed a whole song. The best thing to do is to share it with another guitarist and get some feedback. Congrats, you’re well on the way to mastering the basics of transcribing!
Let me know below if you have tried these transcribing basics and what your first piece was!


Leave a Reply